Beginning Webz
Table of contents
Key Idea
Webz is a lightweight web framework designed for this book. It uses many of the same principals as more advanced web frameworks such as React and Angular, but simplifies operations to focus on TypeScript development
Working Example of Webz
Below you can see a fully working example of Webz in action. Try running the code to see what it looks like in action! Notice that there are three files for the component: main.component.ts, main.component.html, and main.component.css. The html file contains the structure of the component, the css file contains the styling, and the ts file contains the logic. The ts file uses decorators to attach methods and properties of the class to the html by the element’s id attribute. We’ll explain all of this in more detail throughout this chapter.
import { BindValue, Click, WebzComponent } from "@boots-edu/webz";
import html from "./main.component.html";
import css from "./main.component.css";

class MainComponent extends WebzComponent {
    @BindValue("name")
    name: string = "World";

    @BindValue("count")
    count: string = "0";

    @Click("button")
    onClick() {
        this.count = (parseInt(this.count, 10) + 1).toString();
    }

    constructor() {
        super(html, css);
    }
}
<div>
    <span>Hello there, <span id="name"></span></span>
    <button id="button">Click me!</button>
    <div>
        <span>Count: <span id="count"></span></span>
    </div>
</div>
button {
    background-color: blue;
    color: white;
}
Overview
Once we have some html, we would like it to do something. That’s where the TypeScript comes in. You can create a web application without a framework, but it can be difficult and requires a deeper knowledge of how a web browser works. Many frameworks exist, but because they are for commercial purposes, they are large and have steep learning curves (Angular, VueJS, React, etc.) We created Webz to be a lighter weight, easier to learn framework that will prepare you for more complex frameworks that may come later and allow you to create impressive applications without a steep learning curve (still a curve, just not as steep).
The Webz Model
The Webz model uses standard html and css like we talked about in the last section inside the basic unit of a component. Every project starts with 1 component called MainComponent. It has an html file, a css file, and a ts file to get you started (and a file for your tests). Additional components can be created and inserted into the MainComponent to build an object-oriented web application. Some Key design points:
- The html is plain html.
- The css is plain css.
- The ts file uses decorators to attach methods and properties of the class to the html by the element’s id attribute (I told you we would need it later). The finished product is compiled into a website that can be published on any web server.
Getting Started with Webz
To get started, we need to install the Webz command line tool from NPM.
npm i -g @boots-edu/webz-cli
To create a new project called Example Project, we can use the cli to build (scaffold) the code.
webz new first-example
This creates a fully working website with one component in it (MainComponent)
This installs a basic Webz project with a single component in it that you can edit, and a lot of support files that you can ignore. You are only interested in what is inside the src/app folder (src\app on Windows)
Webz is a component-based system. Individual elements should be broken up into components and attached to the web document in the constructor. If we navigate to the src/app folder at a command prompt, we can add more components using the CLI interface.
webz component fancy-image
This will create a folder with the 4 files in it (Just like MainComponent)
Here you can see the structure created for us. This does not attach the component to anything, it just creates the files for us. To add the FancyImageComponent somewhere inside MainComponent we edit the files for MainComponent
First the html (main.component.html) (note the div is where the new component will go (image-holder). The buttons are to allow us to navigate later in the example):
<div id="image-holder"></div>
<br />
<button id="prev">Previous</button>
<button id="next">Next</button>
And the TypeScript class (main.component.ts):
export class MainComponent extends WebzComponent {
    private fancyImg: FancyImageComponent = new FancyImageComponent();
    constructor() {
        super(html, css);
        this.addComponent(this.fancyImg, "image-holder");
    }
}
The div #image-holder is where we attach our component. We have also added two buttons which we can use to control our fancy image component.
We can run this to make sure it worked with npm run start. We should see the default text for fancy-image and 2 buttons on the screen.
Now we will add the html and css for the fancy-image component. We will also put two images img1.jpg and img2.jpg into the assets folder.
Replace the html with:
<img id="image"></img>
Add CSS to set its size:
#image {
    height: 300px;
}
Now we have a place for our image, and we have set its size. What we want to do is have a variable in our class that is the name of the image we want to display: the imagePath property in the following code. Here in this online version of the book, we use the path ../../assets/images/pet-ada.jpg; but you would be able to use assets/images/pet-ada.jpg in your local environment (as long as you place a file named pet-ada.jpg in the assets/images folder).
export class FancyImageComponent extends WebzComponent {
    public imagePath: string = "../../assets/images/pet-ada.jpg";

    constructor() {
        super(html, css);
    }
}
To connect html elements and class properties, we use TypeScript decorators to specify how to attach that variable to the html. In this case we want to set the src attribute of the element with id image. This will cause the src attribute of the element with id image to contain the text in the member property imagePath.
export class FancyImageComponent extends WebzComponent {
    @BindAttribute("image", "src") //this is the decorator binding src attribute of element with id image
    public imagePath: string = "../../assets/images/pet-ada.jpg";

    constructor() {
        super(html, css);
    }
}
If you run this code with npm run start you will see the image displayed.
Let’s see the new example so far:
import { BindValue, Click, WebzComponent } from "@boots-edu/webz";
import html from "./main.component.html";
// Normally, there would be a folder containing the component,
// but for simplicity, we will just import the component directly instead of
// import { FancyImageComponent } from "./fancy-image/fancy-image.component";
import { FancyImageComponent } from "./fancy-image.component";

class MainComponent extends WebzComponent {
    private fancyImg: FancyImageComponent = new FancyImageComponent();

    constructor() {
        super(html, "");
        this.addComponent(this.fancyImg, "image-holder");
    }
}
<div id="image-holder"></div>
<br />
<button id="prev">Previous</button>
<button id="next">Next</button>
import { BindAttribute, WebzComponent } from "@boots-edu/webz";
import html from "./fancy-image.component.html";
import css from "./fancy-image.component.css";

console.log(html, css);

export class FancyImageComponent extends WebzComponent {
    @BindAttribute("image", "src")
    public imagePath: string = "../../assets/images/pet-ada.jpg";

    constructor() {
        super(html, css);
    }
}
<img id="image"></img>
#image {
    height: 300px;
}
Decorator transforms
While this is nice, I would rather use a numeric value (1 or 2) to select my image. I can do that in Webz by using a custom transform.
class FancyImageComponent extends WebzComponent {

    @BindAttribute("image", "src", (imgNum: number): string => {
	    return `../../assets/images/pet-${imgNum}.jpg`;
    })
    public image: number = 1;

    ... // Rest of class omitted for brevity
}
Notice that we pass an anonymous function to the bind decorator that takes a number and returns a string. Now we can just change the image number and it will just modify the img tag to load the correct image.
Remember the buttons we added to MainComponent. What do we want them to do:
- If we are at the first image, disable the previous button.
- If we are at the second image, disable the next button.
- If next is pushed increment the image number
- If previous is pushed decrement the image number
So first we need variables to bind to the disabled attribute of the buttons so we can disable them. There is a special decorator in Webz, @BindDisabledToBoolean that greatly simplifies this process for us.
export class MainComponent extends WebzComponent {
	private fancyImg: FancyImageComponent = new FancyImageComponent();

	@BindDisabledToBoolean("prev")
	public prevDisabled: boolean = true;

	@BindDisabledToBoolean("next")
	public nextDisabled: boolean = false;

	. . . //rest of class omitted for brevity
}
Then we need to bind the button’s click events to a function that increments/decrements the value and properly sets the values of prevDisabled and nextDisabled. Notice that the html id of the buttons is prev and next. We use that in the @Click decorator to specify which button we are binding.
class MainComponent extends WebzComponent {
    . . . //rest of class omitted for brevity

	@Click("next")
	onNext(){
		this.fancyImg.image++;
		this.prevDisabled = false;
		if(this.fancyImg.image === 2){
			this.nextDisabled = true;
		}
	}
	@Click("prev")
	onPrev(){
		this.fancyImg.image--;
		this.nextDisabled = false;
		if(this.fancyImg.image === 1){
			this.prevDisabled = true;
		}
	}
}
If next is pushed:
- Increment the image number
- Enable the previous button
- Disable the next button if prev is pushed:
- Decrement the image number
- Disable the previous button
- Enable the next button
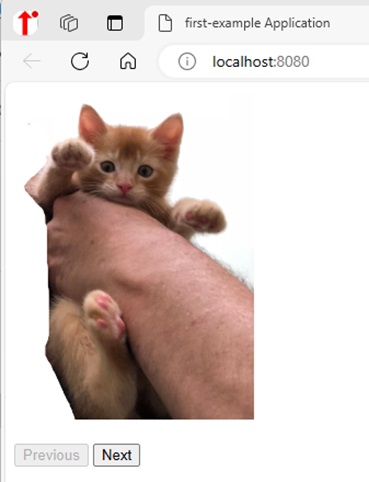
If we run this with npm run start we will initially see pet-1.jpg displayed and our buttons.
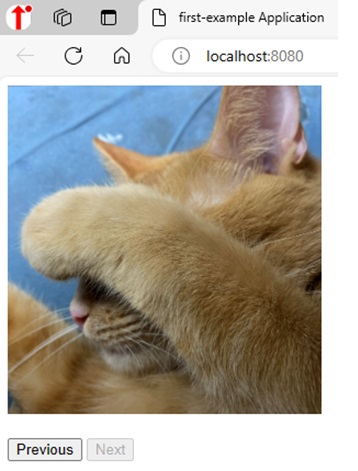
Clicking the next enables the previous button, disables the next button and displays pet-2.jpg.
There really isn’t much more to it. Bind decorators connect properties to elements. If we change the property, the element changes (NOT THE OTHER WAY AROUND). Event Decorators capture events from the web page allowing us to react to those events. These are decorators like @Click(...). We will cover some more advanced features in the next chapter, but these are the basics.
And here is the complete example here in the browser:
import { BindDisabledToBoolean, Click, WebzComponent } from "@boots-edu/webz";
import html from "./main.component.html";
import { FancyImageComponent } from "./fancy-image.component";

class MainComponent extends WebzComponent {
    private fancyImg: FancyImageComponent = new FancyImageComponent();

    @BindDisabledToBoolean("prev")
    public prevDisabled: boolean = true;

    @BindDisabledToBoolean("next")
    public nextDisabled: boolean = false;

    constructor() {
        super(html, "");
        this.addComponent(this.fancyImg, "image-holder");
    }

    @Click("next")
    onNext() {
        this.fancyImg.image++;
        this.prevDisabled = false;
        if (this.fancyImg.image === 2) {
            this.nextDisabled = true;
        }
    }
    @Click("prev")
    onPrev() {
        this.fancyImg.image--;
        this.nextDisabled = false;
        if (this.fancyImg.image === 1) {
            this.prevDisabled = true;
        }
    }
}
<div id="image-holder"></div>
<br />
<button id="prev">Previous</button>
<button id="next">Next</button>
import { BindAttribute, WebzComponent } from "@boots-edu/webz";
import html from "./fancy-image.component.html";
import css from "./fancy-image.component.css";

console.log(html, css);

export class FancyImageComponent extends WebzComponent {
    @BindAttribute("image", "src", (imgNum: number): string => {
        return `../../assets/images/pet-${imgNum}.jpg`;
    })
    public image: number = 1;

    constructor() {
        super(html, css);
    }
}
<img id="image"></img>
#image {
    height: 100px;
}
Decorators in Webz
Here, we will list out all of the useful decorators in Webz. You can only use these on a class derived from WebzComponent. All classes created with the CLI will automatically subclass WebzComponent. The Bind Decorators are used to move data from the class to the html. The Event Decorators are used to move data from the html to the class.
Bind Decorators
First, here are the decorators for binding variables to elements, which allow the element to change when a field (member variable) changes in the class:
@BindValue(id, ?trans)- Binds a member variable to the value of an element (useful for changing the text of an element)@BindAttribute(id, attr, ?trans)- Binds a member variable to an HTML attribute of an element (useful for changing the rest of the content of an element)@BindStyle(id, style, ?trans)- Binds a member variable to a CSS style of an element (useful for changing the look and feel of an element)@BindCSSClass(id, class, ?trans)- Binds a member variable to a CSS class of an element (useful for quickly changing many style properties at once)
Some of these decorators have an optional transform function that can be used to transform the value before it is applied to the element. This is useful for things like adding a prefix to a value or converting a number to a string.
Some of these transformations are so common (like converting a number) that Webz provides them for you. For example, @BindValueToNumber will convert a string to a number before applying it to the element. Here’s the complete list:
@BindValueToNumber(id, ?append)- Converts the value from a number to a string before applying it to the element (useful for binding numeric fields to text elements)@BindCSSClassToBoolean(id, class)- Applies the class to the element if the value is true, removes it if the value is false (useful for conditionally applying styles)@BindDisabledToBoolean(id)- Disables the element if the value is true, enables it if the value is false (useful for conditionally disabling things)@BindVisibleToBoolean(id)- Shows the element if the value is true, hides it if the value is false (useful for conditionally showing things)@BindStyleToNumber(id, style, ?append)- Converts the value from a number to a string before applying it to the element (useful for binding numeric fields to style properties)@BindStyleToNumberAppendPx(id, style)- Converts the value from a number to a string and appends “px” before applying it to the element (useful for binding numeric fields to style properties that require “px” units, such as padding, margin, width, height, etc.)
Event Decorators
On the other hand, when you want the instance to react to an event on the element, you can use the decorators below to bind a method to an event. Most of the time, you will want to use one of these specialized decorators:
@Click(id) (e: MouseEvent)=>{}for when any element (like a button or an image) is clicked on with the mouse or tapped.@Change(id) (e: ValueEvent)=>{}for when an element’s value changes (like a dropdown box)@Input(id) (e: ValueEvent)=>{}for when an editable text element’s value changes (like a textbox or input box).@Blur(id) (e: Event)=>{}for when an element loses focus (like clicking away from a textbox)
Then there are the generic event decorators, which can be used for any HTML event (keep in mind that there are actually many HTML events):
@GenericEvent(id,eventType) (e:Event)=>{}for when ANY event occurs on an element. This can be used to capture other kinds of events not covered by the specialized decorators.@WindowEvent(eventType) (e:WindowEvent)=>{}for when an event occurs on the window (like resizing the window, closing the tab, or typing a key outside of an element).@Timer(milliseconds) (f:TimerCancelFunction)=>{}for setting a timer that will go off later. A future chapter will talk about timers in more detail.
References
This is merely scratching the surface of what is possible with web development. Here are some references to help you learn more about HTML and CSS.
HTML References:
- Intro: https://developer.mozilla.org/en-US/docs/Learn/Getting_started_with_the_web/HTML_basics
- Reference: https://www.w3schools.com/tags/default.asp
CSS References:
- Intro: https://developer.mozilla.org/en-US/docs/Learn/CSS/First_steps/Getting_started
- Reference: https://www.w3schools.com/cssref/index.php
Playgrounds to experiment in:
- https://playcode.io/html
- https://www.w3schools.com/tryit/
- https://jsfiddle.net/
Summary
In this section we learned about the Webz framework and how we can build a simple interactive application. The CLI can be used to generate new projects, and add components to an existing project. We can then attach code and variables to our html using the various decorators outlined in this chapter.
Next Step
Next we’ll walkthrough building a Webz application, step by step, with the Webz Basics Walkthrough »